As a VCH requirement, all Employees need their availability entered in order to show when they are available or not available for work. This availability is used when matching employees and clients for scheduling and is also referenced by the HS Supply and Demand dashboard. *check with your lead to find out more about the dashboard.
Note: An employee should never be marked as available for an all day window as this indicates they are available to work 24 hrs. The only exception would be staff who are available for live-ins.
Contents in this article:
Creating an Availability Rotation
Changing an Availability Rotation
Viewing Availability in the Employee Schedule
Creating an Availability Rotation
1. From the Employee Information, select Availability.
2. In the Availability calendar, select the first day you want the rotation to start. Eg. Monday.
3. Click from the ribbon or rt. click in the calendar > Create/Add Rotation.
4. Choose Create Employee Specific Rotation, then OK. It is recommended not to use the Master Rotation.
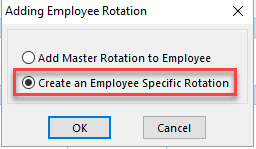
The Rotation Availability Definition window appears. Main areas to consider when entering availability:
1. Name field. This defaults to the creation date, not the date of when the rotation begins. Best practice is to update the Name field with the date the rotation begins to avoid error messages. Eg. Salmon, Su - 12/12/2022 - if the first day of the rotation begins on Dec. 12, 2022.
2. Effective Date and Expiry Date. Effective date is when the rotation begins. Expiry Date is added if the rotation has a known end date. Best practice is to update future availability to avoid a missing availability.
3. Availability for Days. Enter the rotation window times here. The default is that all days are ticked available and All Day. Best practice is to uncheck the days the employee is OFF and then add in when the employee is available to work.
5. Update the Name field to reflect the Effective Date to avoid error messages when making changes. The rotation name will default to today's date.
6. Double check the Effective Date to confirm the start of the rotation.
7. Only enter an Expiry date for time limited availability. Remember to update future availability as required.
8. In the Availability for Days section, uncheck the Available boxes on the days the staff are not available to work. Note: these are the OFF days.
9. Next, enter the availability.
a) Start by adding the times on Day 1 that will repeat to other days. Eg. 8 am - 6 pm Mon - Fri.
b) Click on the up arrow to add availability window times. Note: Name field is not used.
10. Click Copy Day to copy the availability times to the other checked days.
11. Confirm that the Copy From and the Copy to fields are correct.
12. Click Copy. All the checked days are now filled with the copied availability window time(s).
13. Confirm availability is correct then click OK.
14. Save Changes.
15. Review and process any conflicts (this appears only if the employee has an active schedule).
You will now see the Availability schedule is updated to reflect days off and available days.
Split Availability
You can add up to 5 availability windows per day.
1. Click on the up arrow to add more availability window times. Eg. Wed 8 - 10 pm
2. Click OK.
The additional availability is now visible in the calendar.
Changing an Availability Rotation
You can edit an existing availability, which changes the historical and future rotation. Note: Only edit if a rotation was entered incorrectly. When an employee changes their availability, create a new rotation that adds future availability and discontinues the previous availability rotation.
To edit an existing availability rotation, follow these steps:
1. Double click on any time within the rotation you want to edit or rt. click > Edit Availability
2. Make your changes then OK.
3. Review and process any conflicts (this appears only if the employee has an active schedule).
The availability calendar will now be updated with the changes.
To add a new availability rotation and discontinue the previous rotation, follow these steps:
1. Select the first day the new rotation begins.
2. Follow the above steps for creating a new availability rotation.
3. Confirm the rotation changes in the Processing Availability window. Expiry date of the old rotation will be the day before the new one begins.
The availability calendar will now reflect the new rotation.
Adding a Onetime Availability
Adding a Onetime Availability allows you to add availabilities over the regular rotation. Eg. changes to days off, changes to availability windows.
1. In the Availability calendar, select the first day you want the Onetime to occur.
2. Click from the ribbon or rt. click in the calendar > Create Onetime
3. Update the appropriate fields depending on why you are adding a Onetime.
4. If Total Days is more than 1 and the Availability for Days, Reason and comments are the same, use Copy Day to copy over the information.
This example is showing an employee who will be available for 2 OFF days.
5. OK and save changes.
The availability calendar is updated with a onetime availability of 2 days.
Viewing Availability in the Employee Schedule
Once the employee's availability is entered, you can easily see when the employee is off, or what their availability times are from their schedule.
Follow these steps to set up the schedule to show availability times and off days.
1. In the Employee Schedule, go to
2. Under Display Options > check
The schedule will now show:
a) off days in dark grey.
b) availability details at the bottom right of the schedule for the selected calendar day.