When building a client's schedule, first read the HSO and get an understanding of what the client needs, when they need it, and how it should be organized. Then create the new ongoing schedule.
Note: the Scheduling Calendar is only open for the next 10-12 weeks. Regular visit patterns will be generated forward on a regular basis.
Follow these steps from the Client Schedule to create and edit different visit patterns.
Contents in this article:
Add a Multiple Visit Pattern

Multiple visits are many visits that are defined at the same time instead of creating each visit pattern individually. Example: Monday, Wednesday, Friday 10-11 am and 6-7 pm, Thursday 1-2 pm. Multiple visits when filled, appear on the calendar in either blue or black, depending on how the visits were defined.
- Click Multiple.
- Review the Client Visit screen for the correct Order. The visit should be linked to the appropriate funder order not a Client Charge order. If you need to change the Order type, click on the Order field and pick the correct one from the list.
- Click Multiple Visits in the Client Visit window.
- Make sure the First Visits Start Date is correct.
- If there is a stop date, then select and enter the Visits Stop Date.
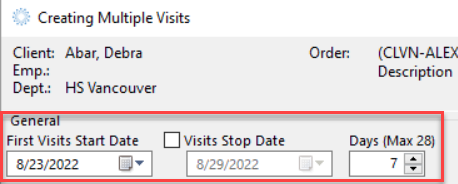
- Start by entering the visits that repeat eg. Monday, Wednesday, Friday 10-11 am and 6-7 pm. Start with the first day of the pattern, eg. Monday.
- Check off the days that require the same visit times and confirm that the Copy from and the Copy to fields are correct.
- Click Copy > Copy to All Checked Days. This shortcut saves you time from entering every day with the same information.
- Next, enter any other day and time. Eg. Thursday 1-2pm.
- When finished, click Close then OK from the Client Visit window.
- Process any conflicts then send to the correct Planner for scheduling.
Note on editing: You cannot edit Multiple Visits after they have been booked. You will have to manually update each individual visit pattern.
Add a Regular Visit Pattern
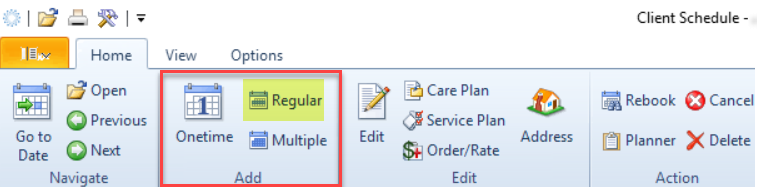
Regular visits recur based on a specific pattern and continue until an expiry date or the end of the active scheduling period. Example: Sundays 9-11 am every week. Regular visits when filled, appear on the calendar in black.

- Click Regular.
- Review the Client Visit screen for the correct Order. The visit should be linked to the appropriate funder order not a Client Charge order. If you need to change the Order type, click on the Order field and pick the correct one from the list.
- Pattern Type is defaulted to every 1 week. However, you can change the pattern by selecting another pattern Type and/or the frequency. Note: the preferred pattern type is WX (every x weeks) as it is easier to match with a regular worker.
- Enter the Date, Start, Stop times and Expire After (if pattern is ending after a certain time frame).
- Duration will auto-populate.
- Click OK. This will open the Conflict Checking window.
- Process any conflicts then send to the correct Planner for scheduling.
Add a Onetime Visit

A Onetime visit is a one-off, it does not recur. Example: September 1, 9-10 am. Onetime visits when filled, appear on the calendar in blue. Note: A Onetime visit can also occur if a change is made to a regular visit.
- Click Onetime.
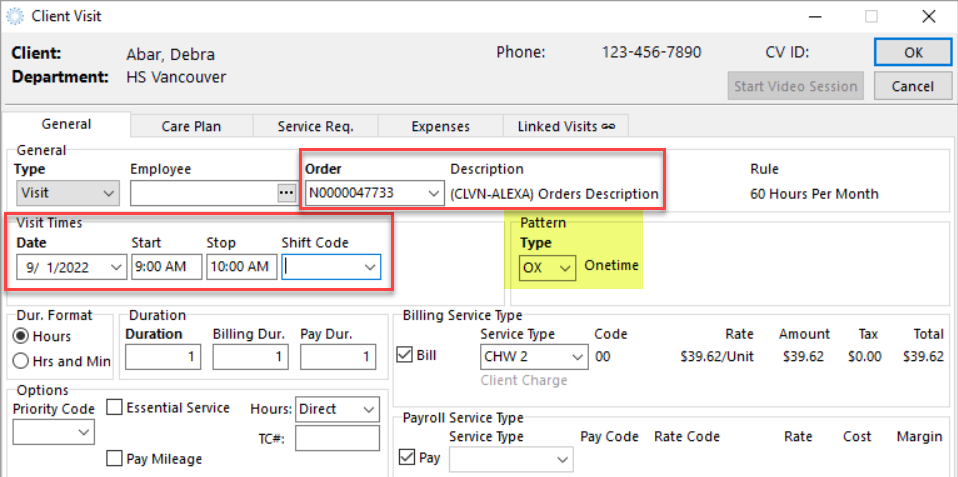
- Review Client Visit screen for the correct Order. The visit should be linked to the appropriate funder order not a Client Charge order. If you need to change the Order type, click on the Order field and pick the correct one from the list.
- Pattern Type is defaulted to OX (One-time).
- Enter the Date, Start and Stop times.
- Duration will auto-populate.
- Click OK. This will open the Conflict Checking window.
- Process any conflicts then send to the correct Planner for scheduling.